The little gray and pink sideboard I painted a few weeks ago was a quite popular piece. Like me, most people loved the surprise hot pink on the inside, even knowing it will be hidden most of the time. It’s just nice to know it is there, and that every time you open the cabinet it will make you smile. It gives the piece a happy soul.
Knowing that I would be doing it all over again on this big lady made me excited to wake up and go to work.

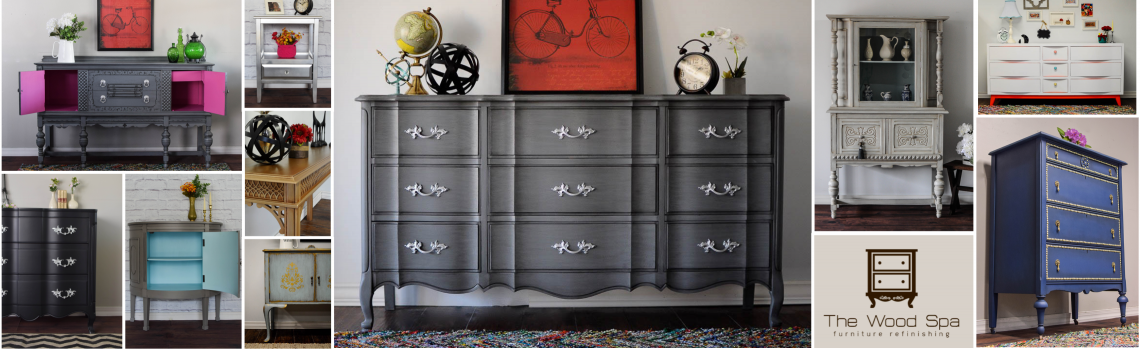
I got a lot of questions on how I painted the sideboard so, for this one, I decided to take the time and show you the step by step. (Scroll down to the bottom if you just want to see the pictures of the final result).
![]()
What I used:
Rust-oleum bright coat spray paint for the knobs.
Rust-oleum Primer Spray – gray for the outside
Rust-oleum Primer Spray – white for the inside
Benjamin Moore Steel Wool – satin (outside)
Valspar Passionate Peony – satin (inside)
Black glaze – Valspar Clear Glaze mixed with black latex paint (ratio 4:1)
Cheap brush to apply glaze.
Minwax polycrylic satin to seal.
This gorgeous buffet was in fairly good shape, but there were some scratches and damaged veneer that needed love and care.


This is the wood filler I’ve been using lately for more serious damages. It is super hard, similar to bondo and won’t shrink or break after it dries.


I spray painted the knobs with silver spray paint.

After sanding and cleaning the whole piece I sprayed white primer on the inside and gray primer on the outside. No need to tape at this point as this is just to prepare the piece for the paint.

After the primer was dry, I sprayed the inside of cabinets and drawers with Valspar Passionate Peony.

After a couple of hours, when the pink was dry, I sprayed Ben Moore Steel Wool on the outside. This time I painted and covered all pink areas to avoid overspray.


I waited until the day after to apply the glaze. I used a cheap brush to apply it, covering one small area at a time, pushing it into all nooks and crannies, and immediately wiping most of it off with a baby wipe.


Finally, after the piece was dry, I sealed it with Minwax polycrylic spray.
Voilà! The big sister was ready, and I was not disappointed 🙂


Thanks for reading.
Love,
Patricia.


Beautiful!
LikeLike
The grey is just beautiful – what a good job!!
LikeLiked by 1 person
Thanks Barbara!
LikeLike
This is gorgeous!!!!! Mai I ask what power sprayer you use??
LikeLike
Thanks! Sure, I use HomeRight Paint Sprayer. Here is the link. https://goo.gl/kLRX2k
LikeLike
Amazing piece! I’ve been hand painting the interiors worried a sprayer would drop.. Is there a trip to using a sprayer outside and especially inside cabinets?, 🤔❤️
LikeLike
Amazing piece! 😍 I’ve been hand painting the interiors of my furniture pieces, worried a sprayer would drip and be more of a pain than a help…. Is there a trick to using a sprayer and especially on the nside of cabinets?, 🤔❤️
LikeLike
Thanks Kathryn! I spray the first coat of paint inside of cabinets but I prefer to add a second coat with a good paintbrush to reach all sides and corners and achieve a solid even finish. I also apply the sealer with a sponge brush instead of spray.
Good luck!
LikeLike
Stunning! All I can say is Stunning! Inside and out! Well done!
Smiles!
Terry
The Curator’s Collection & Making Broken Beautiful (Thursdays)
LikeLike
Thanks Terry!
LikeLiked by 1 person
This really is adorable! I agree the pop of pink makes it so fun!! Thanks for linking up to Friday’s Furniture Fix!!
LikeLike
Thank you Melanie!
LikeLike
stunning. Beautifully done.
LikeLike
Thank you Jolinda!
LikeLike
Fantastic colour combination ! Awesome job.
LikeLike
Thanks Claire!
LikeLike
It looks superb love the grey love the pink 🙂
LikeLike
Thank you Denise!
LikeLike
Hi, Patricia!! First of all, love your story and how you became addicted to furniture refinishing, mine is really similar! And second, love what you did with that buffet, so cool now! The glaze you gave it make all the details stand out.
I would love to invite you to share it with us at our new Sweet Inspiration party, which is live every Friday: http://sweethings.net/sweet-inspiration-link-party-2/
Hugs,
LikeLike
Thanks Pili!
So nice of you to invite me! Of course I will share it.
Looking forward to seeing your work too!
Patricia.
LikeLike
A stunning piece indeed! This one is even better than it’s little sister because it has all those nooks and crannies that can be highlighted as you did! You have taken it to a whole new level. Patricia thank you for joining Pili and me, at our Sweet Inspiration link party, we hope you will share your future projects with us as well.
LikeLiked by 1 person
Thank you so much for your kind words Mary! I can’t wait to see all the beautiful things you guys have in your site. I’ll certainly start sharing my projects in your link party. Thanks again for the invitation!
Patricia.
LikeLiked by 1 person
Wow, what a beautiful piece! I would never have thought that the starting piece was my style, but I absolutely love the finished product! Awesome use of the glaze to highlight all those little details!
LikeLike
Thanks Jen! Glaze does miracles with detailed pieces like this one, right?
LikeLike
I love the pop of pink! What a GREAT surprise. Nice workoverall! Awesome piece!
LikeLike
Thanks!
LikeLike
Fabulous! I just arrived here from the linkup via Mary’s blog. We’ve bought a home in Greece and I am slowly, very slowly – ‘siga, siga’ as they say here working up my courage to tackle painting some things. A pine chest in the guest bedroom is about to be the subject of my first chalk painting attempt. You’ve given me inspiration!
LikeLiked by 1 person
Thank you! Go for it! Start with a small piece and you’ll see there is nothing to be afraid of. Good luck!
LikeLike
Simply beautiful!
LikeLike
Thank you!
LikeLike
I’m wanting to recreate your Buffett. Love the colors as soon as I saw your pictures, I knew I wanted to tackle a piece of furniture my dad left for me thru his Heritance. I had it tucked away for many years and there is some damage on the veneer doors. Half of it came off when I was disassembling it. My question is…. should I try to piece the veneer back onto the cabinet doors or leave it off and sand, prime and paint. The cabinet has good bones but, it has been sitting in damp storage and put some wear & tear to the Buffett.
This is my first time to restore a piece of furniture, I’m excited to tackle this mostly since is so sentimental and dear to my heart!
I’m following your steps but, not sure what to do about the doors?
Any suggestions will help:)
LikeLike
Hi Edie, I usually fix the veneer using a very hard wood filler. There are several videos showing how to do it and this one is my favorite. https://www.youtube.com/watch?v=J8ezOI7QnGw I work exactly like Angela, but instead of bondo I use Minwax High Performance wood filler, which is probably made of the same stuff as bondo. Use a respirator as you don’t want to inhale the fumes. You can use a regular sand paper instead of an electric sander, but avoid putting too much bondo or you will take hours to sand. It’s better to cover only the damaged area and if after you sand you’re not happy, apply a little more and sand it again. Good luck! Feel free to ask more questions 🙂
LikeLike
This has to be one of the most beautiful pieces I’ve ever seen. Your choice of colors and finishes is PERFECT .
LikeLike
Thanks Maria Anne! This is also one of my favorites!
LikeLike
OMG!!! I have a buffet that I am redoing and after seeing your buffet I am going to paint mine in the same tones!!
LikeLike
Awesome! Enjoy your project! I’m sure it will look beautiful.
LikeLike
I absolutely love all the pieces you have done with these colors & glaze! I can’t wait to give it a try on a console I rescued from a thrift store – thank you so much for the inspiration & instructions!
I noticed on a couple of the pieces (French dresser & the baby to this piece I think) you said you made hinemade chalk paint using bm steel wool color in satin – but on this piece you said you sprayed it in the same color in satin but no mention of it being chalk paint. Did you spray regular latec satin paint & not chalk paint on this piece? If so, which version do you prefer? I’m very curious to know if after the glaze & poly the final result is the same regardless of which paintpaint type you use to start?
Thanks again for sharing your beautiful pieces!
LikeLike
Thanks for your kind words Jenny! Lately I’ve been spraying latex paint (no chalk) then glazing. I think the difference is very subtle and I love both. You do need to light sand and prime your pieces when you use latex paint. I used to skip the priming when using chalk paint but I had some bleeding problems so I now always prime, even before chalk paint.
I hope this helps!
LikeLike
Yes that helps a great deal thank you very much!
I started working on my console using homemade chalk paint but it didn’t play nice with my paint sprayer lol so I sanded it down and started all over again using latex satin – I just finished spraying the first coat and so far I’m loving it 🙂
I have a couple additional questions if you don’t mind:
I’m wondering if you spray more than one coat and if so do you sand between coats?
Also you mentioned finishing with Minwax polycrylic spray and I’m wondering if you use the spray can version or if you spray the liquid with your gun? I’ve never used the spray can version before because I was afraid it wouldn’t protect enough or give a nice shine like the thicker liquid does but your pieces look flawlessly finished with a great deal it shine so I’m curious how you finish your pieces and if you spray between coats of the polycrylic as well
Thanks again for all your help! I really would like to be successful selling the furniture that I love creating and I enjoy learning new techniques! I’m grateful that you are kind enough to share your expertise with all of us newbies 🙂
LikeLike
I’m glad it’s working Jenny. I’m yet to find the perfect top coat, so I keep trying new things.So far polycrylic spray has been the best, though far from perfect. I use their spray cans but they form some bubbles sometimes and it’s a headache. On my last piece I applied the polycrylic (regular can) using my paint sprayer and was very happy with the result. No bubbles and a more even finish. I do apply at least three coats, and so far they’ve been holding well. I only sand between coats on areas where the finish doesn’t feel smooth to the touch.
I think the light shine you see on most of my pieces is due to the satin finish of both paint and top coat.
Feel free to ask more!
Enjoy your holiday,
Patricia.
LikeLike
Thanks again!
What ratio do you mix your glaze? And how many glaze costs do put on?
I’ve tried 4-1 & it was too light, then 50%/50% & better but a little too dark from the start so I just did about 75%-25% & it was better but after 3 coats it got 2 dark on me smh lol.
I love your baby wipe suggestion but sometimes it ends up looking like water droplets
It’s probably my perfectionist tendencies driving me crazy lol but I thought I’d ask your ratio & coats (iI watched your video & its very helpful)
Thanks!
LikeLike
It must be hard to be a perfectionist and do this. I hear you 🙂
4:1 is a rough number. I like to be able to work with the glaze with enough time to make changes and that’s why I don’t add much paint. With more paint the mix dries faster. You will find your own perfect ratio, there is no exact recipe, just the one you prefer to work with.
Good luck!
Patricia.
LikeLike
Pat, I just discovered your amazing furniture. I’m so inspired by you. My question is, would the glaze ( without black latex tin it) work with light colored furniture? I’m worried about yellowing of the furniture. I have used poly and basically ruined my daughters play table which was supposed to be light blue, everything turned yellow. Does that happen with using the glaze?
LikeLike
Thanks for your kind words Selma!
The glaze I use is water based so it won’t yellow. What yellows light colors are oil-based sealers such as polyurethane. I normally seal my pices with polycrylic, which is water-based so I dont have that problem.
Good luck!
LikeLike
This is probably a silly question but when you said you sand the whole thing, do you sand the sides and front, etc before priming also? Thanks I have an old Buffett that requires a lot of wood filling.
LikeLike
Hi Cecelia, yes, I light sanded the entire piece. No need to remove the previous furnish. The sanding is to help remove old dirt and create tooth for the new paint to stick better.
Remember to clean it well, removing the sawdust.
Good luck!
LikeLike